Friday, April 29, 2011

Earning Coupons with Recyclebank

Way back in December I posted about a few online group deals and savings sites, and today I wanted to share another one with you!

*Recyclebank is a great site that allows you to earn points and use them towards rewards.....lots to choose from, but my favorite is always the coupon for a FREE latte from McDonald's!  If you are lucky enough to live in one of the areas eligible for the home recycling program, you can earn points simply for putting out your recyclables to be collected.  If not (like me), there are lots of quizzes and codes and other ways to earn points.  Currently there are many points available in the "Green Your Home" section.  I'm almost ready to get myself another iced caramel latte  :)


This link will take you to Recyclebank's sign up..... in the interest of full disclosure, I do earn points if you sign up..... so if that's not something you feel comfortable with, please feel free to go to their homepage directly!  Hope it helps you get some great coupons!!


Thursday, April 28, 2011

Cupcake Liner Flower Bouquet

Jackson loves to do projects and wanted to do something special for his Nana's birthday a few weeks ago.  We brainstormed and decided we'd give her a bouquet of flowers.  This is one of those super easy kid projects that they can do mostly by themselves and be so proud of the end result!

Materials needed:  white cupcake liners, green chenille stems (aka pipe cleaners), watercolor paint.

Step 1:  Decorate the cupcake liners using the watercolor paints.  For optimum performance, your child should still be wearing their jammies and also have bed head.


Step 2:  Allow liners to dry completely.


Step 3:  Roll one end of the stems a few times, then gently push the other end of the stem through the cupcake liner and pull all the way through.  The rolled end will catch, and you will "bunch up" the liner around it to create the flower.


Step 4:  Gather into a bouquet and enjoy!


We made these as a birthday gift, but they would also be perfect for Mother's Day, Teacher Appreciation, or even a 1st Day of Spring activity!  You can get as creative as you want....adding construction paper leaves would be another easy option.


Linking up to a few of my favorites!

So happy to be featured!!


Tuesday, April 26, 2011

Tiptoe Through the Tulips

One of my favorite things about Spring.....tulips!  Tulips are some of my favorite flowers and they are currently in full bloom, so after church on Easter we had a little photo shoot with Carly and the tulips.  Jackson was spending time with his grandparents, so he missed out on this photo shoot....but I don't think he was disappointed :)


Sunday, April 24, 2011

Why Easter?

Easter is just plain fun.  You usually have a few days off - at the very least a long weekend.  You get to decorate eggs, hunt for them, give your kids Easter baskets filled with goodies - maybe even get one yourself (thanks to my in-laws, I still do!!)  And let's not forget, Easter is really the only day of the year when it's perfectly acceptable for your breakfast to consist of Cadbury eggs and marshmallow peeps!

But along with the fun and the food, the reason we celebrate Easter is because of the death and resurrection of Jesus.  It is to remember that...
"Jesus had risen, just as He told them He would. After a criminal does his time in jail and fully satisfies the sentence, the law has no more claim on him and he walks out free. Jesus Christ came to pay the penalty for our sins. That was an infinite sentence, but He must have satisfied it fully, because on Easter Sunday He walked out free. The resurrection was God’s way of stamping PAID IN FULL right across history so that nobody could miss it."  (Tim Keller on The Resurrection).


So thankful that Jesus conquered the grave!  Have a blessed Easter, everyone!


Wednesday, April 20, 2011

Frugal Mud Room Storage

Just in case you didn't see my guest post over at The Frugal Girls, I'm reposting it here for your viewing pleasure :)

I'm going to show you how we turned this...


into this.....


for a lot less than you might think!!

When we remodeled our laundry room and mud room, I knew I wanted some storage for the odds and ends that can be overwhelming to keep track of ~ hats, mittens, scarves, sunglasses, etc, but I wanted to spend as little as possible.  I remembered the set of bookshelves pictured above that just been sitting in the garage since we had picked them up at a yard sale a few years ago for only $1 and thought they would be just perfect!
The bookshelves were solid wood and in pretty good shape, but just needed a little updating.  We went to Home Depot to buy a little paint, and noticed they have an "OOPS" section for paint that was mixed incorrectly or returned by the customer.  We bought a small can of black paint for $1!
We painted the bookshelves and since I'm loving the vintage look lately, I used the palm sander around the edges to give it a more aged look (which you'll be able to see later).
So the bookshelves were completed for a total of $2, and remained empty for several months while I searched for the right baskets.  And search I did ~ at every retailer I could think of!  Unfortunately, baskets aren't cheap!  (I did look at various thrift stores, but the difficult part was finding 4 baskets that matched).  I found baskets I loved at Target, but couldn't believe it when I looked at the price tag and they were $16 each!!  Back to the ole' drawing board! 
Finally, we took a trip to IKEA where I found the lovely Agen baskets ~ they would fit perfectly; the only problem ~ they were white, not brown.  I bought 4 and unfortunately I don't have the receipt and they are no longer on the IKEA website, but I believe they were around $6 apiece.  I didn't love the white ~ but no problem.  Enter Krylon's Brown Boots.


For $2.99/can (I used about a can and a half) I was able to spraypaint the baskets to the brown color I wanted ~ and I don't think anyone would notice!!  Here's a comparison of the baskets, and you can also a closer view of the bookshelves...


What about the rest of the decor?


The white apothecary jar I found at a thrift store for $1.97 and spraypainted to give it a fresh new look.  The "M" monogram was a Hobby Lobby deal normally priced $5.99 but I had a 40% off coupon, so around $3.60.  As far as the stack of books, two were passed down from grandparents and one was a library buy for 50 cents, all tied up with a piece of twine.  The rest of the decorations were found "shopping the house," which is a great trick when you are looking for something new and don't want to spend any money ~ just move things from other areas of your home!

The grand total?  Less than $40 ~ less than what it would have cost to buy just 3 of those baskets at Target!!

Moral of the story?  When you are looking at a great deal that might look less than perfect, try to look past it's current version and think of the potential it may have ~ it could save you a lot of money!!


Linking to some of my favorites!

Visit thecsiproject.com


I am honored to be featured!

Monday, April 18, 2011

Easter Treats

Since today was not a school day, Jackson and I made a few Easter Treats while Carly napped.  Along with the chocolate-dipped peeps that have been a blogland favorite,


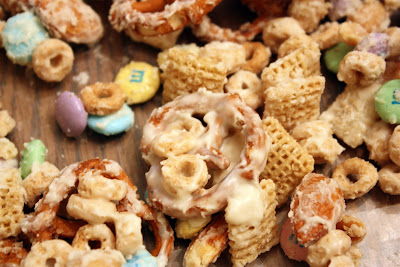
we also made a long time family favorite...white chocolate mix, and gave it an Easter twist by using the fun pastel M&M's.  Here's the recipe, taken from our church cookbook:

In large bowl, combine 5 c Cheerios, 5 c Chex or Crispix, bag of mini pretzels (approx 10 oz), 2 c nuts (I used peanuts and almonds this time), and 1 lb M&Ms.


In microwave safe bowl, melt 2 packages (12 oz each) vanilla chips with 3 tbsp vegetable oil.  Stir until smooth.  Pour over cereal mixture and mix well.  Spread onto wax paper until cool.


Break apart, eat, and if you have any leftovers....store them in an airtight container!


Along with a few of my favorites, I'll be linking to

Photobucket

Sunday, April 17, 2011

For the Love of Burlap

My love of burlap continues.  Following the same steps I used for my last burlap & sharpie pillow, I made this one for my Mother-in-Law...


I'm still loving the look of sharpies on burlap!  Now I just need to find a stash of pillow forms on sale, because I have approximately 300 other ideas of burlap pillows to make!!


Along with some of my other favorites, I'll be linking this up to


The DIY Show Off

Thanks for the feature!!
The DIY Show Off

Thursday, April 14, 2011

Living Room Tour

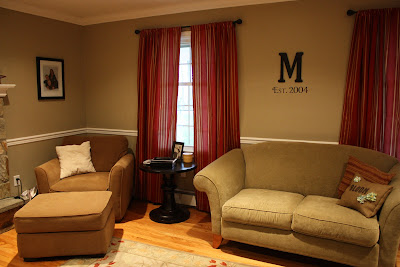
You've seen our newly remodeled Mud/Laundry Room and our hideous kitchen....now welcome to our cozy Living Room!


"Cozy," at least, is the look I'm going for :)  I don't necessarily have a style, but I want my family and friends to be able to feel comfortable and welcomed in my home.  It's a put your feet up on the table kinda place!
You probably remember from my kitchen that the previous owners of our house loved the color blue.  Like a lot.  So this "before" photo (taken at our home inspection) probably won't surprise you...


Clearly, it could be worse.  Some of you might even like the before better than the after, and that's okay.  But it's definitely not my style.  We were super thankful that the baseboards, chair rail and moulding had recently been painted white ~ the only room in the house where this was the case ~ the rest were hunter green, tan, and you guessed it....blue.  Here's what the same view (mostly) is looking like these days...
I love my Pottery Barn Adeline rug and Farmhouse Armoire....I know the cool thing to do is have a flat screen tv mounted on the wall, but I just really prefer a great piece of furniture that I can close the doors of and pretend the tv is not even there!

Although we added recessed lighting, we live in a shaded area and with a porch directly in front of the living room that blocks a lot of the sunlight, this room is still never too bright, so sorry about the lighting!  You have probably noticed on the walls the lack of many decorations, and that is for two reasons....one:  I like to keep things simple, and two:  it takes me sooo long to decide what to put up on my walls!!  One of the pictures I do have was a wedding present from my dear friend, Sonya!  I still love it, friend!!  (Sidenote:  Sonya and her friend have started an etsy shop.....be sure to check it out....maybe someday she will add some of her photography!)


Another "before" picture...


I didn't get the exact same view for the "after" shot, but here's a few from that side of the room...

Eventually I'd love to create a gallery wall above the couch, but for now my framed poppy poster from Michael's is working....even if I still think it's hanging a few inches too high. 

Another thing we'd like to do eventually is have a fireplace insert that is actually inside the fireplace and doesn't stick out...and hopefully one without any shiny bronze!  I do loooove my chair & ottoman ~ they are super comfortable and you'll never guess where I found them......Walmart!  Who knew?!

Continuing around the room...


My side table is also from PB.  Our couch and loveseat were bought at a turniture store when we were first married...probably not what I would pick today but they are neutral enough to work with anything!

You've probably noticed that I love Pottery Barn, and now I feel like my reputation as a frugalista is at stake!!  I want to mention that we do live near a PB Outlet, where we got our armoire for an incredible deal because of a few scratches.  The rug is from PB but I actually bought it on eBay, and the side table was bought with a combination of money I received for Christmas gifts and some really good sales & coupons!  And, this transformation took place over a course of several years - not one major shopping spree.  There, I feel better now.  Do I think something needs to be a famous brand name or cost a lot of money to look good?  Absolutely not!!  Case in point ~ our coffee table (pictured below with my remade cloche).


Made from reclaimed wood and purchased at one of our favorite antique/thrift stores for $20!!  I smile when I think about when I purchased it (over five years ago now) and the picture I must have been at 8 months pregnant trying to shove it into the backseat of my Dodge Neon.  :)  I love how uneven and imperfect it is....great for our young kids and we don't even need to use coasters!

Although it's not yet in it's perfect state, it's a comfy and warm place for our family.  I hope you enjoyed the tour of our living room!!


Linking up to a few of my favorites!

Tuesday, April 12, 2011

An Old Stack of Books & A Guest Post

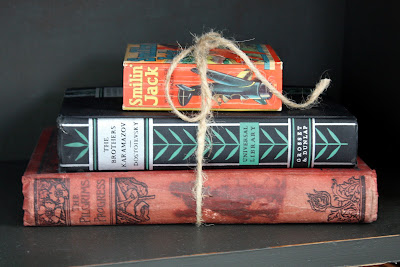
I love things with character, and what has more character than an old stack of books?  The great news is, it can be a fun and very frugal decorative addition to your home!


From top to bottom:  "Smilin' Jack" was given to us by Jon's Grandpa.  It's from 1937 and we picked it because of the name ~ perfect for our son!  "The Brothers Karamazov" ~ a classic we picked up at a library sale for 50 cents.  "The Pilgrim's Progress" ~ a classic of Christian literature ~ and just the look of it alone would make it special, but it actually has an even better story.  We discovered this book in my Grandma's attic.  The name written on the inside is "Lydia Miller," which is my great-great grandmother, who was born around 1860.  Love!  All tied up with a piece of twine for a total cost of 50 cents!  Here it is lookin' cute on our tranformed bookshelves.......which you can currently see at my new guest post over at The Frugal Girls!


If you've never been there, The Frugal Girls is an amazing site dedicated to one of my favorite things...saving money!!!  If you never want to miss another deal, it's a great place to go!  Thanks again, Heidi!

If you are a visiting Frugal Girl, WELCOME!!  I hope you get a chance to look around a bit ~ you might be especially interested in my "Under $5" decorating and craft ideas, and my "Secrets of Savings" series.  Hope you enjoy ~ don't forget to say "hi" or even become a follower ~ there's many more frugal ideas to come!!

Thursday, April 7, 2011

Burlap Pillow with Sharpie Decor

Earlier this week I had my first guest post over at Nicole's Thrifty Decorating.  Nikki graciously said I can re-post the project here so I can link it up to a few burlap project parties (more information on those at the end).  So here it is....my burlap pillow!

Did you ever have one of those all-of-the-sudden-ideas that you feel the need to complete say......five minutes ago?  That happened to me a few days ago.  We had about an hour or so before we needed to leave for church, but one kiddo was sleeping, and the hubby and the other kiddo were playing, so the wheels began turning.  I have this nearly unexplainable love for burlap, so I thought I would try a burlap pillow.  I am not exactly proficient at using a sewing machine, but this project was super easy.  To decorate it, I used something I would almost guarantee all of you have in your homes, crafty or not ~ a Sharpie!!

Here's the basic steps I used...
1)  Cut 3 pieces of burlap ~ we are making an easy envelope closure for this pillowcase!  My pillow form was 14x14 inches, so I kind of measured, kind of eyeballed one piece that was 15x15 inches for the front, and then 2 pieces big enough to overlap each other by a few inches for the back.  My pieces were 15 inches high and 10ish inches long.

2)  Decorate the front piece.  Make sure you put something under your burlap so the Sharpie doesn't get through, especially if you are sitting on your living room floor like I was!  Since I am trying anything possible to usher in spring, I chose to stencil the word "BLOOM."  First I outlined and then I colored in the letters.


3)  Pin the pieces together (inside out ~ so "BLOOM" was on the inside!!) and sew.  Attempt to sew straight lines.  I attempted but only slightly succeeded.  I'm not proud of this, but it just proves that anyone can do this project!


4)  Trim the excess burlap, flip right side out and put your pillow form in!  I thought mine looked a little plain, so I added some bright, springy fabric flowers (I used some of this same kind on my changeable wreath).


I'm really happy with the end result and can't wait to do some more burlap & Sharpie projects!!  The possibilities are endless!  (To see another burlap & sharpie pillow I made, click here.)


I just love anything to do with burlap and natural looking fibers like canvas and twine.  April is a great month for this in blogland, because there are 3 (that I know of) great parties especially dedicated to these great materials!  Get your great burlap projects entered ~ I can't wait to be inspired by all the new ideas!

The first is a Burlap Contest sponsored by Canvas Corp that ends April 30th ~ the prizes are burlap supplies from the Canvas Corp ~ swoon!!


The second is the linky party at The CSI Project this week ~ it's all about burlap ~ and it's being sponsored by the Canvas Corp!

Visit thecsiproject.com

Finally, as part of a 1 year anniversary celebration for The DIY Club, there will be 4 different parties beginning April 16.  The one I heart is going to be held at the DIY Show Off and is for all projects dealing with the "Earthy Essentials" ~ canvas, burlap, linen, and twine.  


The DIY Show Off

Along with the burlap linky parties listed above, I may link up to a few of my other favorites!


Thanks for the feature!!!

The DIY Show Off
Related Posts Plugin for WordPress, Blogger...