Showing posts with label OAMC/freezer cooking. Show all posts

Monday, February 13, 2012

Make Ahead Smoothies

Awhile ago, on Pinterest I believe, I had seen the idea of making smoothies ahead of time, freezing them in small portions, and keeping them in the freezer at-the-ready.  I was in love with this idea (yay for OAMC!), but somehow didn't pin it, and in the meantime, lost it.  Argh.  After a LOT of searching pinterest and a few of my favorite blogs, I realized I wasn't going to find the original post.  Luckily for me, there were a ton of other great ideas out there.  I looked at a bunch of different ideas and then came up with my own.

Strawberry Freezer Smoothies:
  • Freeze yogurt in ice cube trays.  For me, a 32 oz container of yogurt filled 2 ice cube trays.
  • Fill resealable baggies with 2 cubes of yogurt and around 3/4 cup of fruit.  (I already had some strawberries frozen, so I used those.  If you are putting fresh fruit in your bags, flash freeze them first so you don't end up with one big clump.  To flash freeze, lay each individual piece of fruit on a cookie sheet & freeze).
  • Since the resealable sandwich bags I used aren't freezer bags, I put them all in one gallon sized freezer bag.....no freezer burn & it corrals them all into one place.
  • To serve, add milk & honey and blend until it's the texture you like.
  • Note:  I froze individual servings because I have one of the Magic Blender knock-offs.  If you are making a regular blender full, just adjust the amounts accordingly.
I also decided to try the Green Monster Smoothies I have been seeing.  I am not a huge vegetable fan (AKA I despise most vegetables) and figure if I can sneak a few in here and there, it will be a huge health benefit!  Now, a bright GREEN (spinach) smoothie isn't exactly hiding anything, but trust me, they taste delicious....not vegetable-y at all!

I made two different green smoothies.  For my first batch, I used the basic ingredients of the recipe at NaturallyElla.  I used what I had on hand - so regular milk instead of almond milk, and no flaxseed.  I whipped up the smoothies and froze them in the ice cube trays.  When I prepare these, I'll need to thaw them out a little first, since I won't be adding anything to them.

I also made up my own (similar) version, this time without the milk so it didn't take up so many of my ice cube trays....I can easily add the milk in the day I make them.  I blended 4 large handfuls of spinach, 2 bananas, and added some canned pineapple on hand that I needed to use up, along with it's juice to make blending easier.  (I did use my large blender for this).  To serve, take 2 or 3 of the frozen spinach cubes, add a few yogurt cubes, some milk & honey, and blend.  There you have it.  A spinach smoothie.  Sounds delightful, doesn't it?  But seriously, folks, they are gooooood!  Take a toddler's word for it.....she LOVED it so much she had two!


So easy, and if your family loves smoothies, having some ready-made packs on hand can be a huge time & money saver (have you ever priced the frozen smoothie packs at the grocery store?!)  I love that you can be creative and throw in whatever fruits you have.....it's impossible to make a bad smoothie or get the recipe wrong!

Bonus:  the strawberry smoothies will be perfect for my kids' Valentine's Day breakfast tomorrow!  (Looking for other quick things to do for Valentine's Day?  Click here!)


And the green spinach smoothie will definitely be on the menu for St. Patrick's Day!


Linking to:  Craft-O-Maniac,

Wednesday, October 12, 2011

Fall Food Favorites: Apple Butter

Just in case you didn't see my guest tutorial last week over at The CSI Project, I'm reposting it here for you today!


Hello fellow CSI Project fans!  I'm Angie from The Cellar Door Stories, and I'm so excited to be here for Fall Food week!  True, when you think of fall food, pumpkin is probably what immediately comes to mind.  But for me, nothing says early fall like apples!  We live close to several apple orchards and have a family tradition of picking apples each year.  Along with homemade applesauce, I like to try out a few new apple recipes each year.  This year I decided to try apple butter, and I'm going to be sharing my recipe with you today!

A friend had mentioned to me that she made apple butter in her slow cooker.  I was intrigued and decided to try it out myself.  Her recipe started with whole apples, and I had already turned my mountain of apples (1 1/2 bushels) into applesauce (go here to see how it's done), so I needed to improvise a little.  I scoured the internet and my recipe books for ideas, and ended up creating a recipe that is kind of a mish-mash of about approximately 36 other recipes I looked at!

First, gather all your ingredients and dump them into your slow cooker (I recommend spraying your crock with cooking spray ~ makes clean-up a LOT easier).  I used the following, but you can definitely tweak the amount to your taste:  10 cups applesauce, 1 cup brown sugar, 1 cup white sugar, 2 teaspoons cinnamon, 1 teaspoon ground cloves.


I cooked my apple butter on HIGH for a total of 12 hours.  By the end of the 12 hours, it was time for me to go to bed and I didn't want to leave my slow cooker on any longer.  I turned it off but left the apple butter in so it kept cooking.  Yes, that seems like a long time!  It takes a long time for some of the liquid to cook out.  Your time will vary depending on the amount you are making and your slow cooker.  Stir occasionally to make sure your applesauce doesn't scorch.  I took the lid off for the last 5 or so hours.

Here's what my apple butter looked like after about 6 hours...


And here's what it looked like in the morning...you can see a lot of the liquid has cooked out, and it's a few shades darker.


I spooned the apple butter into jars - from my original 10 cups of applesauce, I ended up with 8 jars of apple butter.  I still haven't figured out the whole canning thing, so mine went into the freezer, but this could definitely be canned!


Bonus ~ who doesn't love homemade food?  This could make a great little gift for someone!  I decided that as a gift, the jars were looking a little too plain, so I added a raffia bow and some scrapbooking paper stamped "Made Especially for You!"


Add a loaf of homemade bread, and you have a perfect hostess gift for your next fall night out!

Thanks to the CSI Project girls for having me today ~ hope to see you all over at The Cellar Door Stories, where I love to blog about DIY & crafty ideas, food, family (including our adoption journey), frugal tips, and any other random thing that crosses my mind!

Thursday, September 29, 2011

Fall Food Favorites: Homemade Applesauce

Ahhhh......fall!  Cooler weather, soon-to-be-changing leaves, apple cider, pumpkins....I love it all!  One of the things I really love about fall, especially this month ~ apples!  We have fun apple picking at a nearby orchard, and enjoy tasting all kinds of apple treats.  I typically try out new recipes each year, but the one tradition we have that must happen every year is applesauce.
When you make homemade applesauce you not only save money, but you know exactly what ingredients you are using, and in this case it's only one ingredient:  apples.  It tastes much better than what you can buy in stores and it's really not as hard as you might think!  I can remember my grandma and mom both making applesauce over the years, but I didn't really learn how until after I was married, when Jon's grandpa taught me.  I'm a little biased, but I think this is the best applesauce ever.  :)

So here's what you do...
Get some apples.  This year I bought 1 1/2 bushels.  Following Gramps' advice, go for Ginger Gold.  To us they have the perfect taste, so you will not need to add any sugar.  We usually wait a few days and let the apples soften up a little bit.  Then wash them, and use an apple cutter to core & slice them.  (There is no need to peel them if you will be using something like a Victorio Strainer).  Fill a heavy duty pot about 3/4 of the way full, and add a little water - not much, just enough so the apples don't scorch on the bottom.


Cook on medium heat for a little while, stirring every so often (do you like my precise measurements?), until apples are mushy.


When the apples are mushy, dump them into the funnel of your strainer and crank that handle!  You will want a bowl to catch the peels, and also something to collect the actual sauce.  If you have added too much water, most of it will come out with the first couple turns of the crank, and you can dump it out so your applesauce isn't too runny.  **My son loves to help turn the crank, but it is important to have your child stand back when you are dumping your apples into the funnel....they are HOT and could easily burn you!**


When the applesauce cools, fill your containers.  I use plastic containers I buy from my local grocery store's deli.  I wash them out and and save them from year to year.  If I ever learn to can, I could can my applesauce, but since I am intimidated by the canning process, I choose to freeze mine.  Here's a glimpse of my freezer...


my fresh homemade applesauce nearly fills the top shelf!  (Yes, I know I need to defrost!)  We'll have plenty of applesauce and will be able to have a taste of fall throughout the year!

Linked to:  Remodelaholic Recipe Party, The Frugal Girls,

Monday, September 5, 2011

Crock Pot Cooking

Crock pots (I believe slow cooker would be the correct term, since Crock Pot is a brand name?) have to be one of my favorite inventions ever.  Right after indoor plumbing and internet (thanks again for that one, Al Gore!).


Crock Pots have evolved over the years, from the basic on/off model to the programmable version, to a slow cooker trio, to the small little dipper (perfect for warm dips like queso!)  I personally have the one pictured above - nothing fancy, but it serves it's purpose.


New to cooking with your crock pot?  Here's a few hints....
1)  Find a good cookbook.  I use the Fix-It and Forget-It Cookbook - it has over 700 recipes!  Of course there are plenty of good recipes available by searching online too.
2)  Can't spend time in the morning getting everything ready to go in the slow cooker?  This may seem like a really simple idea, but get everything ready the night before and keep it in the refrigerator.  That way all you need to do in the morning is push a few buttons.
3)  Sometimes the worst part about slow cooker cooking is the clean-up.  There are liners available that work really well, but if you don't want to spend the money, spray the inside of your crock pot with cooking spray!


Want to know my latest favorite crock pot recipe?  BBQ Pork Sandwiches!  Besides being super easy, it's also really frugal, and also counts as a freezer meal, which I love.  I wait until pork loin goes on sale for around $1.69/lb.  Where I shop, this sale is typically good for only the big cuts of meat - around 10 or so pounds, but the butcher will cut it at no charge!  So here's what I do...buy about 10 pounds and have the butcher cut it in thirds.  I then take it home and put each third in a freezer bag and put them in the freezer.  To make the BBQ Pork, first thaw the pork loin.  Put it in the crock pot and pour a can of root beer over it.  Cook on low for 5 - 5 1/2 hours.  Shred with forks, scooping off any fat.  Mix with your favorite BBQ sauce and cook for another half hour.  Serve on rolls.  That's it!  It feeds a crowd, so if I'm making it for just my family, I can freeze the leftovers for another meal.

Do you love your crock pot too?  What is your favorite slow cooker recipe?


Linking to a few of my favorites ~ check them out!

So FUN to be featured ~ THANKS!

Friday, July 1, 2011

Patriotic Breakfast

I am literally up to my neck in berries.  Strawberry season is long gone, but this week I picked 4 quarts of red raspberries and bought 20 (yes, twenty) pounds of blueberries. 

We've eaten lots of berries.  I've made Banana-Raspberry Bread and Blueberry Muffins, and frozen a lot of blueberries to be used throughout the year.  But still, I have a lot of berries.  I'm thinking 20 pounds might have been going a smidge overboard.  (Although at $34, I'll have blueberries year round for a fraction of what they would be if I'd be buying them at the grocery store).

Today as I was searching blueberry recipes, I came upon one for Blueberry Sauce.  Super easy:  combine 1 lb blueberries, 1/2 c sugar, 3 tbsp lemon juice, and 2 tsp cornstarch in a medium saucepan.  Stir over medium heat until cornstarch dissolves and then boil four minutes, stirring occasionally.

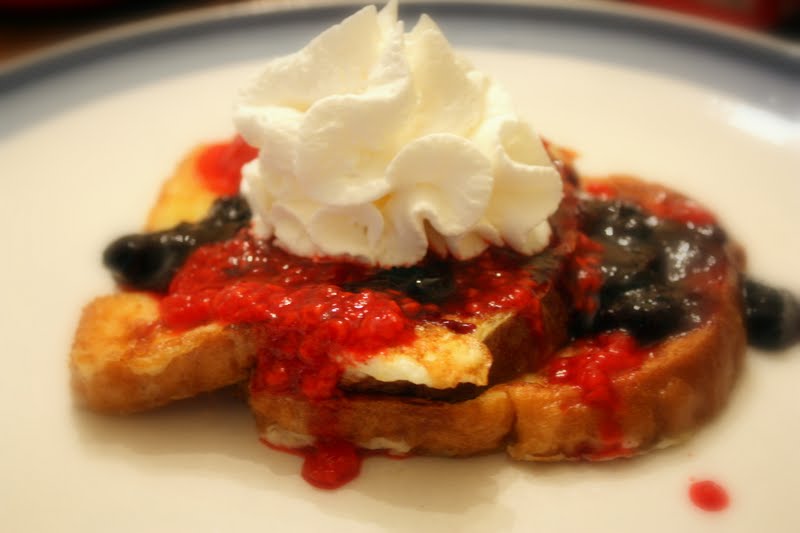
The wheels started turning and I decided to use the last of my red raspberries to make raspberry sauce.  I used basically the same recipe, just tweaking things as I went along.  Since the 4th of July is almost here, I used the two sauces for a patriotic breakfast-for-dinner tonight.  French toast with red, white (Reddi-Whip), and blue toppings!


Both sauces were delicious....Jackson especially loved the blueberry sauce and also put some on his ice cream for dessert.  I still have quite a few blueberries left, so I'm planning on making more of this sauce to freeze.....I'm imagining it on pancakes, cheesecake, angel food cake, there are tons of possibilities!

Anyone have any favorite blueberry recipes to share? 


Linking up to a few of my favorites!

It's such an honor to be featured!  Thanks to...

Friday, June 24, 2011

Chicken...it's what's for Dinner.

It's been a long time since my last post on freezer meals/OAMC.  My freezer had been looking pretty sparse, but a sale on boneless skinless chicken tenders at our local grocery store and a post on freezer cooking by my bloggy friend Natalie gave me the incentive (aka:  kick in the behind) I needed to do another round of freezer cooking!

This time I focused solely on on chicken meals, since that's what was on sale ($1.59/lb).  I packed the kiddos in the car one morning and headed out to the store, and came home with over 20 pounds of chicken.  I might have told the wide-eyed cashier that we "were just hungry for chicken".  I paid $32.45, made 18 meals (9 different kinds to be sure we had a lot of variety), and froze 1.5 lbs of chicken plain, because after doing all the other meals, I was pooped.  Oh, and no....this does not mean my family will be eating only chicken for the next 19 days.  I will definitely space these out over the course of a two or three months!


19 meals for a total of $32.45 (chicken price only)....averages $1.71/meal for a family of 4!  Not too shabby!  Ok, so the actual meal costs a little more....these are only the main dish, so I will add veggies, fruit, rice, etc to balance it out a little.  And yes, there are ingredients in those bags along with the chicken....but they are mostly marinades or other inexpensive things like beans in the chicken chili....so the overall cost for the amount of food in each bag is still definitely less than $2 each.  Even if it wasn't a money saver already, it ends up being a huge time saver and soooo convenient!

Again, the book I typically use is Once-A-Month Cooking and it's one I definitely recommend, especially if you are new to freezer meals.  If you already have the book and are curious, here's the names of the recipes I made this round....  Mandarin Orange Chicken, Herbed Chicken, Chicken Chili, Chile Verde, Karen's BBQ Chicken, Sweet Soy Chicken, Cranberry Chicken, Asian Chicken, and Southwestern Chicken Soup.  My favorites are the ones like Sweet Soy Chicken, which is a "dump recipe," meaning you just dump all the ingredients in the bag.  The chicken marinates as you freeze and then thaw it out, and when it's ready to cook, it's already soaked up lots of deliciousness!!

Here's the super simple "dump recipe" for Sweet Soy Chicken....(I made a few minor adjustments)...
Warm marinade ingredients (1 c honey, 3/4 c low sodium soy sauce, 2 tbsp crushed garlic, 1 tsp ground ginger) until honey is melted.  Pour over 2 1/2 pounds of boneless skinless chicken pieces, label and freeze.  When thawed, pour into baking dish, cover with foil, and bake for 30 minutes at 350.  Uncover, turn chicken, and bake an additional 30 minutes.  I would serve this with rice, some veggies, and applesauce....makes a great meal.

Easy, right??  That amount of chicken is way too much for our family, so I split this and it makes two meals (plus leftovers for the next day's lunch!)  The amount of cooking time seems a little excessive to me, especially if you are using chicken tenders like I do, so you may need to adjust.

Anyway, I heart freezer meals.  I love the feeling of accomplishment and knowing I don't have to take time cooking each afternoon to provide a meal for my family that evening.  This is also a great option if you know of a family in need of a meal....maybe they have been sick, or busy, or you just want to bless them!  Every mom loves a night off from cooking now and then!

Here's a glimpse into my (now packed) freezer...


Ahhh....glorious!  Do you have a go-to freezer recipe you'd like to share?  Let me know in the comments!

Looking for more freezer-friendly recipes?  Check out my other OAMC/freezer cooking posts here!


Linking up to a few of my favorites!!

Saturday, June 4, 2011

It's Strawberry Season!

My favorite thing about June?  Fresh strawberries!!!  Each year we love to go pick a bunch, and then I spend the next day making freezer jam.  I also freeze some strawberries whole, for smoothie making throughout the year, and also freeze some sliced, for strawberry shortcake or to eat over pancakes or french toast.  We save the rest and for the next few weeks I make a LOT of strawberry dishes.  Jackson and I met a friend at the strawberry patch last night and together picked 24 quarts of berries (at $1.75/quart).

We picked 2 kinds...can you tell?  The small dark berries are the best for jam!
Over the next week or so I'll be sharing a few of my favorite strawberry recipes, but for now the most important:  freezer jam.  Our family is pretty big into good ole PB&J, so we go through a lot of jam over the course of the year.  Nothing beats homemade strawberry jam, and it is very cost effective and easy!!

Here's the heroine of the story (or recipe, as the case may be)....


Ball Instant Fruit Pectin....the "no cook" version.  Grab a pack of this, mix it with 1 1/2 cups sugar.  Stir into a bowl of 4 cups of mashed strawberries for 3 minutes, and then ladle into jars.  Allow to set for at least 30 minutes before putting into the freezer.  Seriously.  That's it.  Repeat as desired, until you have a freezer full of jelly!


Coming up later this week.....the BEST Strawberry Pie EVAH.....hint:  it involves chocolate!

What are your favorite things to make with strawberries?

Saturday, January 8, 2011

Freezer Cooking/OAMC

I am a big fan of OAMC (Once A Month Cooking).  I love that a few hours work will stock up my freezer with meals, and I love those days when I don't know what to cook and can just pull a meal out of the freezer.  It ends up saving money, too, because I don't go to the grocery store at the last minute looking for a quick and easy meal.
I've been cooking freezer meals for a few years now.  When I first started, I used this book pretty much exclusively. 


It's a great book that I highly recommend, especially if you are just starting out doing OAMC.  Sure, it's easy to double a casserole recipe and freeze one, but this book gives you everything you need - down to the grocery list and step by step instructions.  I still use the book quite a bit for recipes but don't follow their meal plans much.  Instead, I try to go by what is on sale or just what we are hungry for!
My last batch of freezer cooking went a little slower than expected.  Typically I try to do all the work in a day.  This time I spread it out over a few afternoons.  Our refrigerator and freezer broke, so that put a dent into my plans.  We got a new fridge/freezer (that I LOVE) and then I continued on with the meals.
Here's the list of what I made with links to some of the recipes (the ones without links are from the book).  Many of them are new recipes, so fingers crossed they turn out good!

Slow Cooker Cranberry Pork x2
Chicken Fried Rice x4
Meal on the Run Pork Loin (shredded pork for sandwiches)
Beef Taquitos (this one turned out to be a FAIL since my corn tortillas kept breaking.  I scratched the idea and instead just froze the meat for tacos x3).
Denise's Black Beans (my favorite!) x4
Sausage & Spinach Stuffed Shells x2 (we had this earlier this week and it was delish!)
Crabcakes x3

And because every post is better with a picture, check out this beauty....so new it's still wearing the plastic!  (Just don't look too closely at my hideous blue cabinets...eek....but while you are looking, you can check out our new flooring - there have been a lot of changes around here lately!)
While it was a pain to have to buy a new refrigerator, I did have to hide my excitement a little!  In the 6 1/2 years we have been married, we have lived in 2 houses - both came with their (old) appliances.  It has been SUCH a blessing not to have to buy appliances when we moved, but I'm not gonna lie....it was pretty exciting to get a new washer & dryer, and now refrigerator these past 2 months!  (Although I'm hoping all the other old stuff doesn't die too soon!)
Related Posts Plugin for WordPress, Blogger...