Showing posts with label decorating. Show all posts

Thursday, December 20, 2012

Easy Christmas Card Display

I absolutely love the anticipation of going to the mailbox every day this time of year.  In a time when 99% of our correspondence is done via email or facebook, it is so special to me to actually get Christmas cards from friends and family.  I love every card I get, but I especially love photo cards.  I like to display them throughout the Christmas season, but we do get a lot and sometimes it is hard to find a good spot for them.  For the past few years, I have been taping them to my freezer, but this year I wanted to move them to an area where we would see them more often.

I thought the kitchen or the dining room would be the perfect place since we spend a lot of time in those rooms.  We have a lot of wall space, but I didn't really want to use tape, so that took that idea away.  (Although since then, I have thought about using painter's tape, so that might be an option someday!)

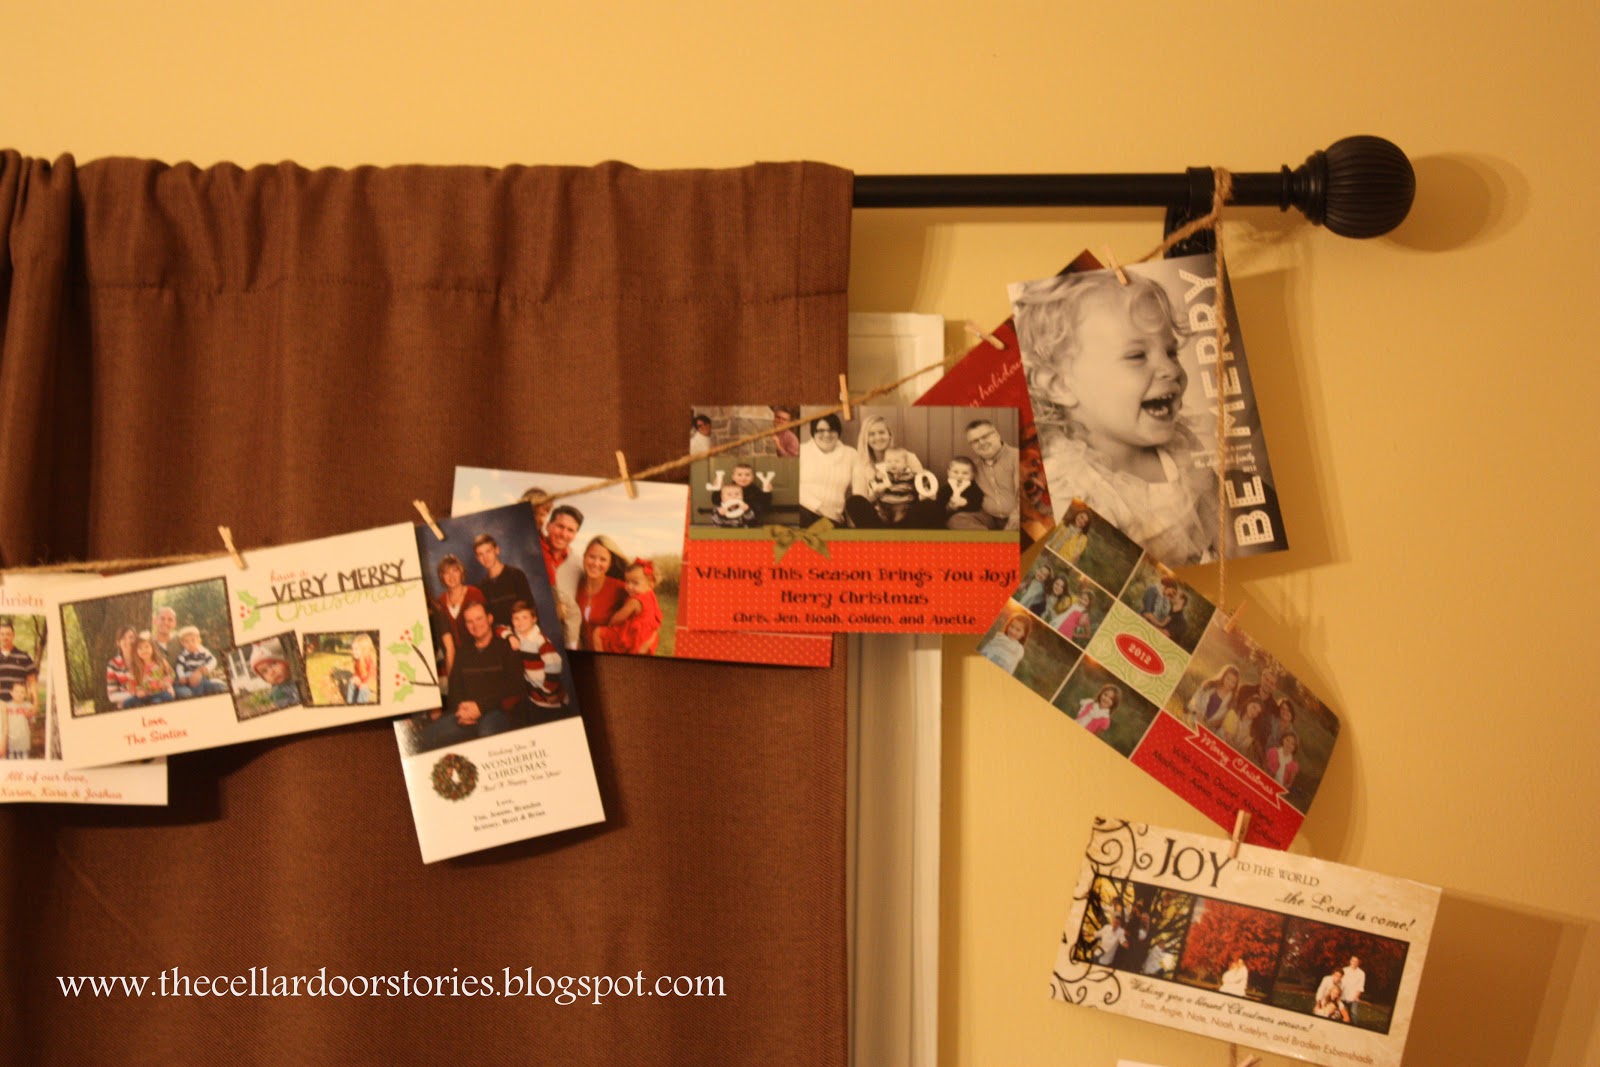
In keeping with my "simple is better" theme, I hung twine from the curtain rod over the sliding doors that lead to our screened-in porch.  I used mini clothespins to attach the cards, and voila ~ instant Christmas card display!

(You can also see the Christmas Burlap Table Runner I made a few years ago, and the Red Chair that we use because our other matching black chair broke!)
Here's a closer view so you can see those cute mini clothespins!  (Find them at places like Hobby Lobby or Michaels).


How do you display your Christmas cards?

Linking to:  simply {kierste},

Tuesday, December 4, 2012

Christmas Mantel

A post not related to adoption?!  It's a Christmas miracle!  :)

Although I haven't been blogging much lately, I still do read some of my favorite blogs once in awhile, and saw that today at The Lettered Cottage there is a link party for Christmas mantels.  I thought I'd share a few pictures of our Christmas mantel.  It's simple, but I love it.  I love to have a cozy home, and I always think it is the coziest at Christmas!

Photobucket

I've been collecting the Willow Tree Nativity pieces since the year Jon & I were engaged.  I love the simplicity of it.  The old window behind it was the result of some dumpster diving :)

Photobucket

I don't like to be ultra matchy-matchy, so the stockings are all knit but aren't part of the same set.  Two are from a flea market, and two were bought at the Pottery Barn Outlet (different years) after the season when they are all clearanced.  If I'm remembering correctly, the reindeer stocking had monogramming, but the price was right at around $1.97, so my seam ripper and I got to work and it looks great!

Photobucket

 It may not be the fanciest, most unique Christmas mantel, but I love it!

The Lettered Cottage
Also linking to:  simply {kierste},

Friday, March 2, 2012

Coffee Bar Decor

I've had an idea for some wall decor for my coffee bar area since we first set it all up a few weeks ago (see it here).  I was able to purchase some burlap coffee sacks from our awesome fundraising partner, Just Love Coffee, and finally made a trip to Hobby Lobby to get a canvas.  This project was so super easy - I literally spent more time in the checkout line to buy the canvas than I did actually completing it!  Ok, in full disclosure, this was my brainchild, but my fantabulous hubby did all the work while I wasted time on facebook supervised.

I bought several of the Ethiopian coffee sacks, but this one was my favorite...I like the green lettering and the random red stripe on the left...


We slid the canvas inside (almost a perfect fit), then cut out the middle of the back so we could pull it tight around the edges.  Then it was time for the handy dandy staple gun!


Jon stapled all around the edges and here's what we ended up with...


And here's what it looks like hanging in our kitchen, next to the coffee bar.


I love burlap, love coffee, and love Ethiopia.  All 3 at once?  Be still my beating heart!  Know what else?  I spent a total of less than $20!

If you are a fan of great coffee, or if you just want to check out a really amazing business, head over the Just Love Coffee.  The link will take you to our fundraiser, where $5 from every bag purchased goes toward our adoption!

Linking to:  Tatertots & Jello, Whipperberry, Bubbly Nature Creations, Funky Junk Interiors, I Heart Naptime,Craft-O-Maniac, Today's Creative Blog, The 36th Avenue, Thrifty Decorating, A Turtle's Life for Me, House of Hepworths, The Frugal Girls,

Tuesday, September 27, 2011

Fun Fall Activity Repost

Looking for a fun fall activity to do with your kiddos?  I'm reposting this from last fall, back when I was the only one who regularly checked my blog!

Ok, so probably everyone has done this craft.  It certainly isn't original but it came out of the recesses of my brain today when I was trying to think of a simple fun activity to do with Jackson while Carly took her nap.  It's easy, cheap, already had all the supplies on hand, and it can double as some fall decoration - so that makes it a win-win-win-win in my book!


Materials needed:  crayons (preferably old or broken ones), crayon or pencil sharpener (or old cheese grater), wax paper, newspaper, scissors, iron, marker.

Layer newspaper, one sheet wax paper, crayon shavings, wax paper, newspaper.  I used an old tea towel on top of it all, too. 

Iron on low setting just until the crayon is melted.  Draw your leaves (don't be jealous of my sweet leaf drawing skills!) and cut them out.  (For the pumpkins, we drew them first so we knew where to put the orange & green). 

Tape or hang them on a window and admire your new cute suncatchers!

(Yep, it's definitely afternoon & he's definitely still wearing pajamas).

Linking to:  The DIY Showoff's Fall Festival Party

Saturday, September 24, 2011

EEK and BOO!

I've been in a funk lately.  A blah sort of mood, where I feel unmotivated, lazy, and let's face it....annoyed.  Anyone watch The Office on Thursday?  Where Pam was all hormonal and crying?  As my husband was sitting on the couch laughing at her, I was sitting in my chair holding back tears.....because Pam........she really gets me.  As much as a fictional character can get someone, at least.  Unlike Pam, I don't have the pregnancy hormones to blame my blah-ness on, but seriously, the ups and downs of adoption, the hurry up and wait, the unknowns.....it's been taking it's toll lately.

Why am I telling you all this?  Really, I have no clue.  I'm actually posting to show off the cutey little Halloween decorations I made yesterday!  I'm typically not a Halloween person.  I don't really decorate for it, because I don't like the witches and goblins and all that spooky stuff.  But yesterday as I was digging through my craft supplies, forcing myself to do something creative to hopefully get out of my funk....I found some black glittery letters that just screamed Halloween!

So, I gathered up some supplies...

The frames were part of a cheapy 3-pack from Ikea.  I painted them with DecoArt Americana's Burnt Orange.

When the orange paint was dry, I gave it a little more character by using a paper towel to rub on a little black paint in spots.  I cut some scrapbooking paper to fit, and put on my sparkly black letters.  Easy peasy.

Here's what I ended up with:

A close-up of the glittery letters...

And again, the end results...

No witches or ghouls, but just a nice little touch of Halloween!


Linked to a few of my favorites, including The DIY Showoff's Fall Festival Party

Sunday, September 11, 2011

Family Blessing Tree

I'm so excited about my latest project ~ even if it purposely won't be completed for many months.  It's our "Family Blessing Tree" and it serves 3 purposes....
1:  To remind our family of how God is always faithful ~ we know we have been called to adopt, even though it's been a sometimes overwhelming process of "how are we going to afford this?", we know God will provide.
2:  Someday when our boys are home and old enough to understand, they can look at this and know how loved and wanted they were by so many people.....even before they knew them.
3:  To have a fun new piece of artwork in my house :)

How does it work?  Basically, when someone helps out towards our adoption, they get a "leaf" with their name on it for our tree.  Of course, this doesn't include only financial donations, but also donations of time (babysitting our kids while we go get fingerprints) and services (like our friend who notarized stacks of papers for free!)

Here's what I'm envisioning our tree will look like someday...


How does it get to that point?  First I gathered all my supplies...a canvas, some scrapbooking papers, a circle punch, Krylon spraypaint (pebble), ModPodge (not pictured) and some Americana paints by DecoArt ~ Burnt Orange and Dark Chocolate.


First I spraypainted my canvas.  Then I realized it was the exact same color as our living room walls.  So I re-spraypainted it an off-white creamy color. 
The next step was to draw an outline of a tree (my husband actually did this for me) and paint it.  I also stenciled the word "blessed" and painted that in as well.


The canvas was looking a little blah, so I added a stripe around the edge for a more "finished" look.


Now comes the fun part!  Each time someone donates something - their time, finances, etc. towards our adoption, I get to punch out a circle, write their name on it (or they can write a message), and modpodge it right on!  An instant way to remember the generosity of our friends and family!

Here's what our Blessing Tree is looking like currently...


And again, what it may look like someday...


You could take this basic idea and change it to suit your needs ~ it could be an actual family tree, or what about a Thankfulness Tree to work on for Thanksgiving this year?

Want to see your name in the lights.....er, on a leaf?  You can check out Our Adoption Journey for a list of our current fundraisers!


Linking this up to a few of my favorites ~ check them out!!

I'm also entering this project in "Crafting With The Stars" ~ hope over and visit me there, because who knows, the number times my project is viewed might help me in the competition!



DIY Club

Thursday, August 25, 2011

Beautiful (FREE) Hydrangea Wreath

At the end of July, I forced myself to take down my patriotic wreath and since then my front door has been looking mighty empty.  With saving for an adoption, I have been trying to be very conscious about the amount of money I spend on non-necessities...and a new wreath, or materials to make one, doesn't really fit under the "needs" category!  Nikki from Thrifty Decorating to the rescue!  She made a beautiful hydrangea wreath and inspired me to do the same.

Mine was slightly different because I had a wire wreath form to use (left over from my Christmas greenery wreath).  After picking the best blooms from my hydrangeas, I used some florist wire to attach them to the wreath.


I just kept going until the wreath was filled!  (Yeah, I switched to working on the living room floor halfway through like always!)


My hydrangeas aren't too big, so the blooms were a bit limited, which made the wreath lack some fullness....so I added a raffia bow to try and make the lack of bloomage less noticeable.


Here's the finished product on the front door ~ I like how it turned out, and of course the best part is that it was totally FREE!  Thanks for the inspiration, Nikki!


Linking to a few of my favorites ~ check them out!!


It's always exciting to be featured ~ thanks so much!


Saturday, July 2, 2011

4th of July Decor on the Cheap: Garland

Talk about last minute...I know, I know.  It's pretty late to just be getting up 4th of July decorations.  But I saw these paper fireworks here and here and just couldn't help myself.  I typically don't change my fireplace mantle seasonally (except for Christmas) but this garland was such an easy thing to do, I just might start!


Instead of gluing the fireworks together like Landee did, I hung some twine and used cute mini clothespins to attach the fireworks.  Here's a closer look....


I also added some letters to spell out "July"...


I'm really pleased with how it turned out!


Argh to the fireplace insert.....someday I will have one that is actually inside the fireplace and has no bronze, but for now, I'll just imagine it.  What do you think about the old window?  It's the one I found dumpster diving back here!

And now the checklist...
Patriotic?  Red, white & blue....check.
Easy?  I seemed to have some issues with my firework making ability, but overall still relatively easy...check.
Cheap?  I had all the supplies on hand, so it was a grand total of $0....check!

I'm almost positive this will be the last in the 4th of July series, unless more inspiration hits!!  Hope you have enjoyed my other 4th of July ideas too.... the wreath, pinwheels, and patriotic breakfast.... check them out if you haven't already had the chance!


Linking this up to some of my favorites ~ go check them out!!

Wednesday, June 29, 2011

4th of July Decor on the Cheap: Pinwheels

Like I said in yesterday's post, I haven't typically decorated for the 4th of July and I wanted to show a little patriotism this year, but I wanted to do it CHEAP.  Here's another super easy, super frugal idea to add a little 4th of July spirit to your home....Dollar Store Pinwheels.

I bought 2 packs of red, white, and blue pinwheels at the Dollar Tree.  I used one set outside as planter decorations on my front porch....


Need a closer look?


With the other set of pinwheels, I grabbed a metal tin from Target's Dollar section, stuffed it with some cotton batting (the foamy stuff for floral arrangements would be a much better solution, but I didn't have any), topped it with a little red burlap and just stuck in the pinwheels!


It's sitting pretty in one of my latest yard sale finds, our new 7-Up Crate, keeping one of the remotes company (the other is still missing.)


On to the checklist...
Patriotic?  Red, White and Blue....check.
Easy?  Buy pinwheels.  Stick them in something.  Check.
Cheap?  $1/set, for a total of $2...(plus $1 for the bucket, but I already had that).  Check.

I think it's cute, but next year I'm definitely going to "splurge" and get some of the floral foam!

**Don't forget...tomorrow is the last day to end my first ever giveaway!!**


Related Posts Plugin for WordPress, Blogger...