Showing posts with label laundry/mud room. Show all posts

Friday, January 27, 2012

Shoe Organization

We have a great little spot off the side of our laundry room where the kids sit and put on their shoes and grab their coats before they head out to the garage to get in the car.  (You can check out the post about the coat rack we made here).  The problem can been seen in this before picture:


And my son is currently at school, so imagine another pair of shoes, a winter coat, and a backpack added to this mess.  Real nice, huh?

After some cleaning, purging, and putting away, here's the AFTER:


Yay!  Much better!  Most of this is thanks to our IKEA trip last weekend.  I had a certain amount of Christmas money to spend, and instead of blowing it all on the sideboard I liked for my coffee bar, I found a side table instead.  I then had enough money leftover to get this great shoe cabinet....


and I'm loving it!  It's super thin and doesn't take up much room at all, keeps the shoes up off the floor, and looks pretty cute while doing it!


PS:  Did you see yesterday's post about our latest adoption fundraiser?  I'm hoping a few of you will donate items from your etsy shop or similar store to help bring our son(s) home from Ethiopia!  Please contact me for more details!

Tuesday, May 31, 2011

DIY Growth Chart

I shared this tutorial last week at The Frugal Girls and I'm reposting it here today in case you didn't see it....

Hi everyone!  I'm so excited to be back here at The Frugal Girls!  The last time I was here, I shared about our frugal mud room storage.  This time the location hasn't changed much....still in my mud room, but it's a new addition about a foot to the right....a DIY Growth Chart...made from materials we already had around the house!  (List of materials needed:  big piece of wood, black paint, white paint, number stencils, sandpaper if you want the distressed look).


I have always loved the idea of a growth chart.  Growing up, I knew a family who dedicated one of the doorframes in their house for this purpose.  It was amazing to see all the friends and family members who had marked their height over the years!  Currently, my mom has a spot in her house where she marks the kid's height when we visit - something my son always looks forward to.  I knew I wanted to have something similar in our home someday, but my main concern was of sentimental value - what would I do if we needed to repaint the room, or even move?  I am way too sentimental to paint over something like a growth chart!
So here's what we did (following the same basic steps as my numbered coat rack):  First, grab a piece of wood.  Any big piece will do!  We found ours in our attic, left here by the previous owners, which is why it is angled at the top - it's really just an old piece of junk wood.  We wanted a distressed look, so we painted the board black and then added several coats of white paint. 

Next it was time to measure.  Sooooo thankful for my helpful husband in times like these....I would much rather just eyeball things, but clearly for this project you need to actually measure, something I really don't have the patience for!  We decided where we wanted the chart to hang on the wall and knew that the first line would be 11 inches from the floor.  He then measured and marked each inch, making the lines longer at 6 inches and again at each foot mark. 


I used black acrylic paint to trace the lines and stencil in the numbers.  Since we were planning to distress it, I knew it was fine if everything wasn't perfect. 


A few coats of paint later and then some extra time to make sure everything was dry and it was time to distress!  We used the palm sander to rough up the edges and go over the whole front, giving it a little character.


All that was left was to attach it to the wall....which took a little extra effort since it is basically ginormous!  The kids were excited to mark their heights immediately...


and I am thrilled to have what is sure to become a treasured piece of family history!


I'm loving this new addition to our mud room!


Linking up to a few of my favorites!


DIY Club

It's so exciting to be featured ~ special thanks to...


thoughts,musings, outlet for frustrations


Wednesday, April 20, 2011

Frugal Mud Room Storage

Just in case you didn't see my guest post over at The Frugal Girls, I'm reposting it here for your viewing pleasure :)

I'm going to show you how we turned this...


into this.....


for a lot less than you might think!!

When we remodeled our laundry room and mud room, I knew I wanted some storage for the odds and ends that can be overwhelming to keep track of ~ hats, mittens, scarves, sunglasses, etc, but I wanted to spend as little as possible.  I remembered the set of bookshelves pictured above that just been sitting in the garage since we had picked them up at a yard sale a few years ago for only $1 and thought they would be just perfect!
The bookshelves were solid wood and in pretty good shape, but just needed a little updating.  We went to Home Depot to buy a little paint, and noticed they have an "OOPS" section for paint that was mixed incorrectly or returned by the customer.  We bought a small can of black paint for $1!
We painted the bookshelves and since I'm loving the vintage look lately, I used the palm sander around the edges to give it a more aged look (which you'll be able to see later).
So the bookshelves were completed for a total of $2, and remained empty for several months while I searched for the right baskets.  And search I did ~ at every retailer I could think of!  Unfortunately, baskets aren't cheap!  (I did look at various thrift stores, but the difficult part was finding 4 baskets that matched).  I found baskets I loved at Target, but couldn't believe it when I looked at the price tag and they were $16 each!!  Back to the ole' drawing board! 
Finally, we took a trip to IKEA where I found the lovely Agen baskets ~ they would fit perfectly; the only problem ~ they were white, not brown.  I bought 4 and unfortunately I don't have the receipt and they are no longer on the IKEA website, but I believe they were around $6 apiece.  I didn't love the white ~ but no problem.  Enter Krylon's Brown Boots.


For $2.99/can (I used about a can and a half) I was able to spraypaint the baskets to the brown color I wanted ~ and I don't think anyone would notice!!  Here's a comparison of the baskets, and you can also a closer view of the bookshelves...


What about the rest of the decor?


The white apothecary jar I found at a thrift store for $1.97 and spraypainted to give it a fresh new look.  The "M" monogram was a Hobby Lobby deal normally priced $5.99 but I had a 40% off coupon, so around $3.60.  As far as the stack of books, two were passed down from grandparents and one was a library buy for 50 cents, all tied up with a piece of twine.  The rest of the decorations were found "shopping the house," which is a great trick when you are looking for something new and don't want to spend any money ~ just move things from other areas of your home!

The grand total?  Less than $40 ~ less than what it would have cost to buy just 3 of those baskets at Target!!

Moral of the story?  When you are looking at a great deal that might look less than perfect, try to look past it's current version and think of the potential it may have ~ it could save you a lot of money!!


Linking to some of my favorites!

Visit thecsiproject.com


I am honored to be featured!

Monday, January 10, 2011

Laundry Room Reveal

Ok, you caught me.  The laundry room still is not 100% complete.  There's still some minor things we need to do and a few things we need to get.  Nonetheless, I'm ready for a reveal.  Just as a reminder, at some point, previous owners had used these two rooms for their dog breeding stuff.  (Check out this previous post for a few "before" pictures).  Obviously not something we were thrilled with, but when we bought the house, we knew someday we could turn it into something useful.  Fast forward 3 1/2 years and we are so pleased with how it turned out!  I just wish I had more "before" pictures for some better comparisons! 

Here's the still-to-do/get list (doesn't include things like fill up the walls with artwork that are more long-term things):
*Putty holes & paint trim!
*Paint doors
*Baskets for shelves
*Shelves for above washer & dryer  (done!  see it here!)
*Doormats!
*Curtains

Now, be prepared for a lot of pictures....sorry for the poor picture quality for some of them....
First, another "before" picture (yes, I was too lazy to scan this so I took a picture of the picture)...it's the view standing in our kitchen looking out to the hallway - the door straight ahead leads to the garage.  Lots of wallpaper.  Lots of blue.  Wallpaper and blue seemed to be the main themes of the house.  And yep, those are ducks on the border.  Or possibly geese.

And the after - new flooring, wallpaper stripped, walls, doors and trim painted - door to garage removed due to the hallway added on to connect the old hallway to the new rooms (along with a peek at my daughter's jammie-covered bum):

Continuing forward:

Turning left around the corner, the laundry room looking into the mud room:

Straight ahead:

I need to find something to sit on it, but I love my little green bench!  It was a great find....in our basement when we moved in!  Here's a close-up - I love that old look that just can't be duplicated - I just wish I knew the story behind it:

Now looking to the right - I want to put baskets on the shelves to hold hats, mittens, etc.  The sliding door on the left leads to a little porch area:

And now, turning around for the backwards walk-through:

The metal bucket is to store "outside stuff":

Just on the other side of the door is the utility sink:

"What is that thing hanging above the sink?" you might ask....and I might tell you - it's a drying rack!  More specifically, a drying rack I saw 2+ years ago at a store going out of business.  I didn't buy it because I didn't have a place for it, but my husband told my mom-in-law about it, and she surprised me with it!  It's been sitting in my closet for a few years, just waiting to be hung up and admired in all it's glory....

And now continuing our backwards walk-through, a view of the laundry room (the wall opposite the washer & dryer)....our freezer and pantry shelves....I also have a great cabinet to put under the window, but I'm using it in another part of the house right now:

On top of the freezer I have these great vintage-y looking grape boxes that I don't know what else to do with (any ideas?):

And on top of the pantry shelves, is this collection of stuff I don't know what else to do with - the Hops bottle is from the (now out of business) restaurant that Jon & I went to on our first date (awww!), the crock and some of the blue mason jars (I loooove blue mason jars) are from my Grandma's house:


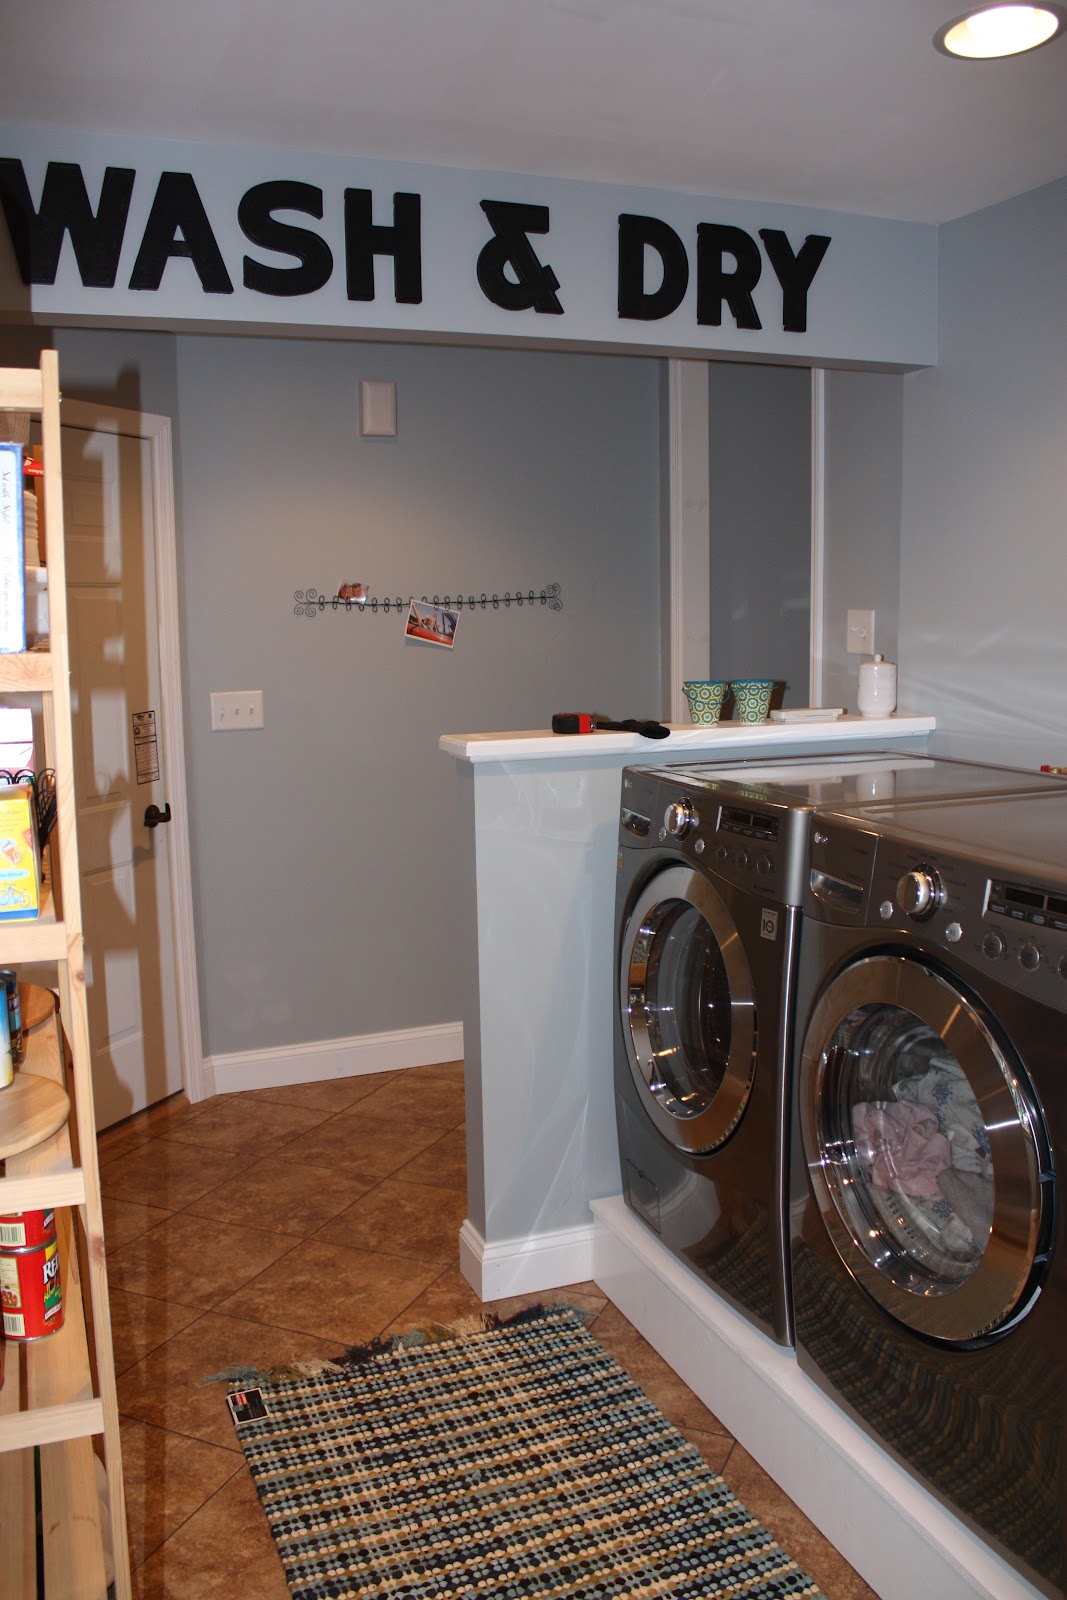
And the other wall looks a little something like this (to help put it in perspective, the utility sink is to the right of the dryer):
In the above picture, Jon built the box to stand the washer & dryer on ($200 per pedestal - no thanks).  The rug may or may not still have a Target  price tag, because I may or may not be returning it.

Besides the green bench (and the washer & dryer of course), my favorite thing would have to be this...
I first posted about these letters back here - we found them at an antique/flea market place - they are letters from an out of business movie theater.  At first I was going to spell out "LAUNDRY" but Jon thought that was too typical.  He was right.  When I saw the "&" it all fell into place.  The only problems were that some of the letters were red and some were black - we solved this with a little spraypaint - also, there were no "A's" - we solved this by turning a "V" upside down and adding a little piece of Armaflex (with an insulator for a husband, many household things are fixed with Armaflex). 

And for the last close-up, I have this little dandy - Pottery Barn used to sell something similar as a Christmas card display but I bought this on Etsy from curlywire (again, a few years ago, just waiting to be used).  I'm not sure I love it in this spot, but I think it will look better when I have more pictures and cards to display - in the meantime, it's a cutie picture of our niece & nephew, and a birthday card from a few years ago that still makes me laugh:

Well, there you have it - The Laundry Room Reveal!  I am loving the extra space and not having to trek down to the basement to do laundry!

Click here to see some of the parties I may have linked to!
I also linked up to:
WhisperWood Cottage
and:
Visit thecsiproject.com
EEK!  *Lots of jumping and clapping!*  I'm so excited becase this project was featured on my very favorite crafty blog!!

Wowzers!  Lots of excitement on this post, becase....


Sunday, January 2, 2011

Numbered Coat Rack

Well, I'm still not quite ready for the laundry room reveal.  But I'm loving the mini-project we just finished for it!  As soon as I saw our little half-wall that hides our washer & dryer and creates a hallway, I knew it would be the perfect spot for some hooks.  Any extra spot to store something or hang something is always great in my book!  I was planning on buying this the next time we made an IKEA trip (one of my most favorite stores EVER), but then I saw this idea by Kierste at Brown Paper Packages, and it inspired me!
So cute!  I love anything distressed, and also anything labeled.... so we made our own version!  We had plenty of leftover material from the pedestal Jon built for the washer & dryer to sit on, so we just cut it down to the size we wanted.  (Perhaps that phrase should read "he just cut it down to the size I wanted"....but anyway).  I found the exact same hooks at Target....right down to the oil rubbed bronze finish.  As you have probably already realized, I only have two kids, and to use their names would have made for a pretty small coat rack.  So we used numbers instead!  Instead of using vinyl like Kierste, I used stencils and paint, and our color scheme is different - so here are my revised DIY instructions:
1 - spray paint board black and let dry completely.
2 - paint white over the black (we used leftover trim paint) and let dry completely.
3 - sand the edges and a little over the whole board.
4 - screw in hooks
5 - use stencils to paint numbers (this time I used some craft paint I had on hand)
6 - after drying completely, sand like crazy for that cool distressed look
7 - realize some parts look weird, so repeat #5 & #6 (not so crazy this time) until you like it again
8 - hang and admire!


Just in case you were wondering (we have already gotten this question) - Why 5?  No, we are not trying to assign numbers to our children and the future children that may come someday!  I wanted at least four hooks, and five was more visually appealing to me and fit better in the space.  There is no hidden meaning in the 5 :)

Click here for a list of parties I may have linked to!
and there's this one too -
Visit thecsiproject.com
Related Posts Plugin for WordPress, Blogger...