We would love to have you praying for our family during this upcoming time of paperwork, home studies, fundraising, and waiting!
Friday, July 15, 2011
It's Official!
Long story short.......we found out last night that we have been officially accepted into the America World Adoption's Ethiopia program!!! We are so excited to expand our family in this wonderful way! More details to come, but for now, we're getting ready for vacation!!!

We would love to have you praying for our family during this upcoming time of paperwork, home studies, fundraising, and waiting!
Tuesday, July 12, 2011
First Aqua Experience
Remember back here when I showed you this cute little table I found at my fave thrift?
If you don't remember, that's ok. I know you were probably so stunned and amazed at my favorite find (Steven Q Urkel) that you couldn't concentrate on all my other great stuff! The table was only $4.50 and since I didn't spend an arm and a leg I decided to experiment with a color I don't normally go for. I have been seeing so much great turquoise and aqua furniture and thought it would be fun to try. I bought a can of Rustoleum's "Aqua" and got to work!
Here she is after the paint was all dry (it's clearly a she, didn't you see those legs?!)....
She was looking a little too clean-cut for me, so I sanded some of the edges to let the original black paint show through for a more distressed look.
Sanding was a definite improvement, but I still wanted to tone down the color a little, so I mixed up a little glaze (I just added some water to the black paint we had left over from the shutters and porch swing). I used a sponge brush and did a small section at a time, painting and then wiping off. (I really have no idea if this was the correct way to do anything, but it worked for me!)
The finished product was looking a little "beachy" to me ~ perfect for summer. I threw on some random summery-type things from around the house ~ a bottle, an old picture of Jon & I at the beach, and I took the bird nest out of the cloche and put in some sand dollars and starfish. Here's the result...
Yep, the baseboard is half painted. This is in our upstairs hallway, where we ripped up carpet and still haven't gotten around to finishing up the painting. Just pretend you don't see it.
I do like how the table turned out and I'm glad I took the aqua plunge. I'm not sure if it's really me, but at $4.50 and a can of spray paint, I won't feel bad if I decide to change it again in a few months!
If you don't remember, that's ok. I know you were probably so stunned and amazed at my favorite find (Steven Q Urkel) that you couldn't concentrate on all my other great stuff! The table was only $4.50 and since I didn't spend an arm and a leg I decided to experiment with a color I don't normally go for. I have been seeing so much great turquoise and aqua furniture and thought it would be fun to try. I bought a can of Rustoleum's "Aqua" and got to work!
Here she is after the paint was all dry (it's clearly a she, didn't you see those legs?!)....
She was looking a little too clean-cut for me, so I sanded some of the edges to let the original black paint show through for a more distressed look.
Sanding was a definite improvement, but I still wanted to tone down the color a little, so I mixed up a little glaze (I just added some water to the black paint we had left over from the shutters and porch swing). I used a sponge brush and did a small section at a time, painting and then wiping off. (I really have no idea if this was the correct way to do anything, but it worked for me!)
The finished product was looking a little "beachy" to me ~ perfect for summer. I threw on some random summery-type things from around the house ~ a bottle, an old picture of Jon & I at the beach, and I took the bird nest out of the cloche and put in some sand dollars and starfish. Here's the result...
Yep, the baseboard is half painted. This is in our upstairs hallway, where we ripped up carpet and still haven't gotten around to finishing up the painting. Just pretend you don't see it.
I do like how the table turned out and I'm glad I took the aqua plunge. I'm not sure if it's really me, but at $4.50 and a can of spray paint, I won't feel bad if I decide to change it again in a few months!
Linking up to a few of my favorites ~ check them out!
Sunday, July 10, 2011
The Hunt for an Outdoor Thermometer
I mentioned back here that I've been looking for a new outdoor thermometer for our screened-in porch. The requirements are pretty simple: non-digital, non-cheapo-plasticky looking, and numbers big enough to see from inside. I haven't been able to find "the one" so I turned to Amazon. (See one you like? Click on the picture to take you to it's Amazon page).
This one's very similar to the one we already have....does the trick but pretty blah.
Here's what I've been seeing a lot of in stores....I like it, but I wish the clock and thermometer were reversed.
I could proclaim my love for the Black & Gold, but ok, I admit....it might be a smidge tacky.
I like this one, but the only problem is it's a little smaller than I wanted.
I like this one, but what's a hygrometer?
This one could be nearly perfect....but sigh....it's almost $50!
Ooooh, this looks fun, but I have no idea how to use it.
Hmmm....maybe this one....

Which one is your favorite? Any other ideas of where to look? (I've checked Home Depot, Target, and Bed Bath & Beyond....and I'd like to try to get to Hobby Lobby). The search continues...
This one's very similar to the one we already have....does the trick but pretty blah.
Here's what I've been seeing a lot of in stores....I like it, but I wish the clock and thermometer were reversed.
I could proclaim my love for the Black & Gold, but ok, I admit....it might be a smidge tacky.
I like this one, but the only problem is it's a little smaller than I wanted.
I like this one, but what's a hygrometer?
This one could be nearly perfect....but sigh....it's almost $50!
Ooooh, this looks fun, but I have no idea how to use it.
Hmmm....maybe this one....
Which one is your favorite? Any other ideas of where to look? (I've checked Home Depot, Target, and Bed Bath & Beyond....and I'd like to try to get to Hobby Lobby). The search continues...
Thursday, July 7, 2011
Porch Progress
A few weeks ago, I posted about one of my favorite outdoor spots ~ our screened-in porch. While there's not much that's new, there's been a teensy bit of progress, so I thought I'd share my super cheapo pillows.
They started out as four pieces....I think they were supposed to be napkins, but they are 100% polyester, so didn't seem like they'd be good for napkins....I dunno. Maybe that's why I found them at the thrift for 40cents apiece.
The problem was, they were all slightly different sizes, and not big enough to make my favorite super duper easy envelope style pillowcases....and my sewing skills are severely limited. I already had pillow forms to use and didn't want to have to use stuffing, so I improvised. (Plus since these are outside, there's a good chance they'll get dirty, so it will be simple to take out the pillow and wash the sham). One pillow got a velcro closure....
The other didn't have enough extra fabric, so I had to sew ribbons and tie them shut.
Anyway, I'm not totally in love with the pillows, but they were uber cheap, so when I get sick of them, I won't have to feel bad about it. And they do show a little progress! If you remember the last time I posted about this, you remember seeing this picture....
The pillows have been added (although I'd still like a few more), so next up...the table! We've already started working on it and I can't wait to see how it turns out!!
PS: Don't forget today is the last day to enjoy FREE SHIPPING from KDG Design Co!!! Just use code CELLARDOOR at checkout.
They started out as four pieces....I think they were supposed to be napkins, but they are 100% polyester, so didn't seem like they'd be good for napkins....I dunno. Maybe that's why I found them at the thrift for 40cents apiece.
The problem was, they were all slightly different sizes, and not big enough to make my favorite super duper easy envelope style pillowcases....and my sewing skills are severely limited. I already had pillow forms to use and didn't want to have to use stuffing, so I improvised. (Plus since these are outside, there's a good chance they'll get dirty, so it will be simple to take out the pillow and wash the sham). One pillow got a velcro closure....
The other didn't have enough extra fabric, so I had to sew ribbons and tie them shut.
Anyway, I'm not totally in love with the pillows, but they were uber cheap, so when I get sick of them, I won't have to feel bad about it. And they do show a little progress! If you remember the last time I posted about this, you remember seeing this picture....
The pillows have been added (although I'd still like a few more), so next up...the table! We've already started working on it and I can't wait to see how it turns out!!
PS: Don't forget today is the last day to enjoy FREE SHIPPING from KDG Design Co!!! Just use code CELLARDOOR at checkout.
Tuesday, July 5, 2011
Awesomesauce!!
Hi everyone ~ hope you had a fantastic 4th of July!! Just wanted to let you know what while the fabulous Allison from House of Hepworths is on vacation, she's been featuring lots of other bloggers ~ and this afternoon, some of my favorite projects are going to be showing up on her amazing blog.....which happens to be one of my FAVORITES! *squeal!*
Make sure you go check it out, and while you are there, look around at the other featured bloggers....there's bound to be TONS of inspiration!! (And of course, going back a bit to HoH in the pre-vacation days is a MUST ~ so many fun ideas and the way Allison writes is hilarious and refreshing!)
Saturday, July 2, 2011
4th of July Decor on the Cheap: Garland
Talk about last minute...I know, I know. It's pretty late to just be getting up 4th of July decorations. But I saw these paper fireworks here and here and just couldn't help myself. I typically don't change my fireplace mantle seasonally (except for Christmas) but this garland was such an easy thing to do, I just might start!
Instead of gluing the fireworks together like Landee did, I hung some twine and used cute mini clothespins to attach the fireworks. Here's a closer look....
I also added some letters to spell out "July"...
I'm really pleased with how it turned out!
Argh to the fireplace insert.....someday I will have one that is actually inside the fireplace and has no bronze, but for now, I'll just imagine it. What do you think about the old window? It's the one I found dumpster diving back here!
And now the checklist...
Patriotic? Red, white & blue....check.
Easy? I seemed to have some issues with my firework making ability, but overall still relatively easy...check.
Cheap? I had all the supplies on hand, so it was a grand total of $0....check!
I'm almost positive this will be the last in the 4th of July series, unless more inspiration hits!! Hope you have enjoyed my other 4th of July ideas too.... the wreath, pinwheels, and patriotic breakfast.... check them out if you haven't already had the chance!
Instead of gluing the fireworks together like Landee did, I hung some twine and used cute mini clothespins to attach the fireworks. Here's a closer look....
I also added some letters to spell out "July"...
I'm really pleased with how it turned out!
Argh to the fireplace insert.....someday I will have one that is actually inside the fireplace and has no bronze, but for now, I'll just imagine it. What do you think about the old window? It's the one I found dumpster diving back here!
And now the checklist...
Patriotic? Red, white & blue....check.
Easy? I seemed to have some issues with my firework making ability, but overall still relatively easy...check.
Cheap? I had all the supplies on hand, so it was a grand total of $0....check!
I'm almost positive this will be the last in the 4th of July series, unless more inspiration hits!! Hope you have enjoyed my other 4th of July ideas too.... the wreath, pinwheels, and patriotic breakfast.... check them out if you haven't already had the chance!
Linking this up to some of my favorites ~ go check them out!!
Friday, July 1, 2011
Patriotic Breakfast
I am literally up to my neck in berries. Strawberry season is long gone, but this week I picked 4 quarts of red raspberries and bought 20 (yes, twenty) pounds of blueberries.
We've eaten lots of berries. I've made Banana-Raspberry Bread and Blueberry Muffins, and frozen a lot of blueberries to be used throughout the year. But still, I have a lot of berries. I'm thinking 20 pounds might have been going a smidge overboard. (Although at $34, I'll have blueberries year round for a fraction of what they would be if I'd be buying them at the grocery store).
Today as I was searching blueberry recipes, I came upon one for Blueberry Sauce. Super easy: combine 1 lb blueberries, 1/2 c sugar, 3 tbsp lemon juice, and 2 tsp cornstarch in a medium saucepan. Stir over medium heat until cornstarch dissolves and then boil four minutes, stirring occasionally.
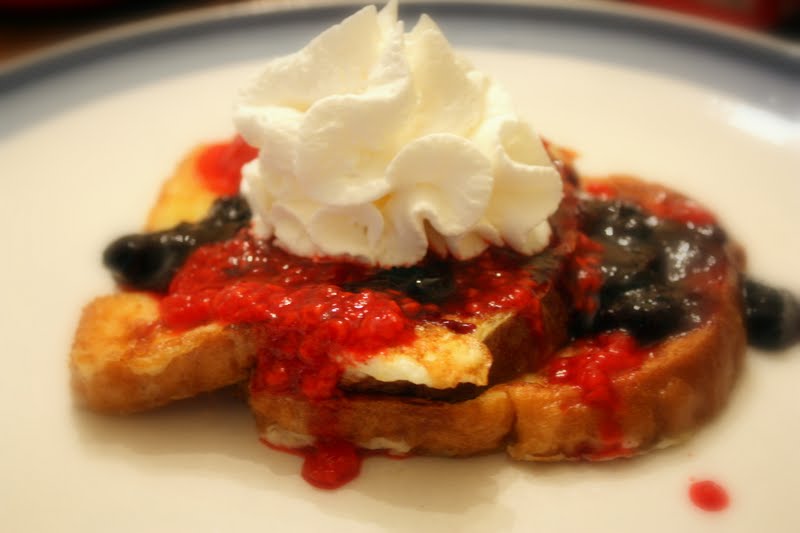
The wheels started turning and I decided to use the last of my red raspberries to make raspberry sauce. I used basically the same recipe, just tweaking things as I went along. Since the 4th of July is almost here, I used the two sauces for a patriotic breakfast-for-dinner tonight. French toast with red, white (Reddi-Whip), and blue toppings!
Anyone have any favorite blueberry recipes to share?
Subscribe to:
Posts (Atom)